Posts

Showing posts from July, 2019

ECOSYSTEM

Image
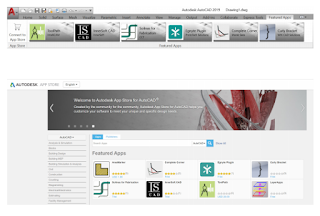
App Store  Specialized Toolsets  AutoCAD Web App  AutoCAD Mobile App 1. App Store  “There’s an app for that.” Explore the Autodesk App Store for hundreds of Autodesk-approved plug-ins, extensions, and standalone applications to make your AutoCAD experience more productive. You can access the Autodesk App Store from within AutoCAD in two ways. From the Ribbon, click on the Featured Apps tab, then the App Store panel and select Connect to App Store. You can also simply click on the shopping cart icon next to your login name. Either method will take you to the App Store website in your default web browser. The featured apps banner at the top scrolls through Autodesk recommended apps, so you can easily stay up to date. If none of the featured apps fits your current needs, you can continue your search by either keyword or your favorite publisher. Once you’ve added your favorite apps, you can view, update, or uninstall them from the Manage Apps tool found in the Ad

DATA MANAGEMENT

Image
External References  eTransmit  PDF Import  Sheet Set Manager 1. External References Insert any drawing file as an external reference (Xref), and changes made in the referenced drawing are reflected automatically in the current drawing when opened or reloaded. Open the External References palette by using the XREF command and select the DWG icon to attach files. Attached Xrefs are linked to, but not actually inserted in, another drawing – which avoids increasing the file size. When you attach an Xref, the default path type is set to Relative to avoid broken Xrefs in the future. If you have relative references in the current drawing and save it to a different location, AutoCAD will prompt you to update the relative paths. BONUS #1: To find an external reference in a complex drawing, select an item in the External References palette to highlight all visible instances in the drawing. Conversely, select an external reference in the drawing to highlight its name i

ANNOTATION

Image
Multiline Text  Spell Checker  Find and Replace  QuickCalc  1. Multiline Text Use multiline text (MTEXT) instead of single line text (TEXT) whenever possible to give you flexibility in editing your text. You can create several paragraphs of text as a single multiline text (MTEXT) object. With the built-in editor, you can format the text appearance, columns, and boundaries. In the Ribbon, select Annotate > Multiline Text (instead of Single Line Text) or use the MTEXT command. BONUS #1: If you’ve already added text via TEXT or DTEXT, use the Express Tool (in the Express Tools tab of the Ribbon) “Convert Text to Mtext” to convert to multiline text after the fact. BONUS #2: Draw text along an arc using the ARCTEXT Express Tool (in the Express Tools tab of the Ribbon). 2. Spell Checker  Avoid embarrassing spelling errors with the spell checker (SPELL) command. There are additional options to check everything, just the current space/layout, or only sel

MODIFYING

Image
Match Properties  Dynamic Blocks  Group  Explode Attributes  DWG Compare 1. Match Properties Copy properties from one object to another using Match Properties (MATCHPROP). The types of properties that can be matched include color, layer, linetype, linetype scale, lineweight, plot style, transparency, and other special properties. 1. Click Home tab > Properties panel > Match Properties or type MATCHPROP into the command line.  2. Select the source object from which you want to copy properties.  3. Select the target objects to which you want to copy the properties, and press Enter. BONUS: Specify what properties you want matched in the Property Settings dialog box. For example, disable the Text (style) property when you want to match the layer between two pieces of text. After Step 2 above, enter S (Settings). In the Property Settings dialog box, clear the properties that you do not want copied, and click OK. 2. Dynamic Blocks Save time and decreas

OBJECTS

Image
Object Snaps  Isolate Objects  Move/Copy/Rotate  Associative Arrays  Dimensions 1. Object Snaps  Use Object Snaps (OSNAP) to draw objects precisely in relation to other objects in your drawing. For example, you can use object snaps to create a line from the center of a circle to the midpoint of another line.  You can specify an object snap whenever you are prompted for a point. By default, a marker and a tooltip are displayed when you move the cursor over an object snap location. To specify an object snap at a prompt for a point, you can:  Press Shift and Right-click to display the Object Snap shortcut menu  Right-click and choose an object snap from the Snap Overrides submenu  Enter the name of an object snap  Click an object snap button on the Object Snap toolbar. This will turn on running object snaps that will persist through all subsequent commands. 2. Isolate Objects Isolate a selected group of objects for easier editing in complicated or busy

VIEWING

Image
Zoom Display Plot Styles Shared Views 1. Zoom Follow the prompts displayed after the ZOOM command to view your drawing exactly how you wish. “ZOOM > All” adjusts the magnification of the drawing area to show all visible objects or the drawing limits set with the LIMITS command. “ZOOM > Extents” displays the maximum extent of all objects. “ZOOM > Dynamic” pans and zooms using a rectangular view box. The view box represents your view, which you can shrink or enlarge and move around the drawing. Positioning and sizing the view box pans or zooms to fill the viewport with the view inside the view box. (This is not available in perspective projection.) BONUS #1: If you have a mouse with a wheel, double-click the mouse wheel to activate Zoom Extents. BONUS #2: Use the command VTENABLE to turn off smooth view transitions which occur during panning and zooming. Setting it to 0 (zero) turns it off for pan/zoom, rotation, and scripts.  2. Display Plot Styles V

SETUP & BASICS

Image
1. Keyboard Shortcuts  2. Autosave  3. Quick Access Toolbar  4. Right-click  5. Layers  6. Draw Order  1. Keyboard Shortcuts Take advantage of AutoCAD-specific keyboard shortcuts to save you valuable time. You can even create or modify the existing shortcuts. 1. Click Manage tab > Customization panel > User Interface, or type CUI into the command line.  2. In the Customize tab, Customizations In pane, click the plus sign (+) next to the Keyboard Shortcuts node to expand it.  3. Click the plus sign (+) next to the Shortcut Keys.   To create a shortcut key, in the Command List pane, drag a command to the Shortcut Keys node in the Customizations In pane.  To modify a shortcut key, select a shortcut key from under the Shortcut Keys node. BONUS: Not to be confused with command aliases, which are abbreviations of commands used in the command line. Edit or create aliases by going to the Express Tools tab of the Ribbon and clicking on the Command Al